Wednesday, February 24, 2016

What 'Cha Workin' on Wednesday??

Well, here it is, Wednesday again and I am still working on Holiday stuff.  This week, I completed a few more fun projects.  In addition to last week's crackled angel, I finished up two more:
These candlesticks are smaller and had small bases.  I screwed on some wood bases before finishing them so they wouldn't get top heavy.  I had these wooden wings in my stash, so once they were painted, I put some ModPodge on them and loaded them up with glitter.  I like the contrast of the rustic crackle with the glitter.  The heads are round wooden balls, simply painted, eyes were dotted and blush applied.  I added a snippet of lace trim for a collar.  The haloes are a bit over the top, but in lieu of hair, I really like them.  They are a couple of small candle rings that I bought at the thrift store on one of my many trips.

I also have been raggin' it.  I made a fall wreath and garland.

As I have told you many times before, this is a great way to use up some of those scraps.  And it is one of the simplest of all crafts.  I like to work on these while I am watching television in the evening. (keeps my hands out of the cheetos, too)  The garland is simply a strand of 20 mini lights.  I buy these up during the holidays at Dollar Tree.  The wreath is actually a ring off of a busted tomato cage.  Then you simply tie on the rags.  I try to keep the strips between 1/2-1 inch wide by about 7 inches long.  If the strips are a bit shorter or longer, no worries.  You can trim off the long ones and the short ones just give it some depth.  When I am collecting my scraps, I use gallon bags.  I divide into three bags:  pastels (for spring wreaths and garlands) warm colors like golds, greens, browns for fall applications, and of course reds, greens, whites for holidays.  When my bag is bursting, I tie some garlands!  I sell these out every year at $12.99 each.  And actually, I have only $1 in the garlands.  It does take some time, but what else would I be doing????

I kind of got off course with my crackle items, huh?  I actually did find some wooden salt and pepper shakers at the thrift store that I made into snowmen.
After these were crackled, all I really did was add the face and scarf and glue on the noses.

A couple of years ago, my sis gave me this basket.  She had purchased it with some pips in it but they were all damaged.  I had plenty so I removed the old, added the new along with some stars and moss and Voila!  A great piece for your table, mantle, or night stand!
Well, my peeps, enough for me today.  This is my birthday week so I will have the whole clan over here this weekend.  Love seeing the grand-babies!  Have a great week!

Wednesday, February 10, 2016

What 'cha Working on Wednesday?

It seems like the snow and wind have, at least temporarily stopped for a few days, so I took my spray cans and splatter to the back yard and finished up a couple of things.  I finally got the train case finished:


I've also been working on some candlesticks and salt and pepper shakers that I thrifted.  I like to make the candlesticks into angels and the salt and pepper shakers into snowmen.
I love using crackle medium.  It gives wooden pieces a worn, yet elegant look.  If you have never used it before, I can give you some pointers.

  1. Some people are really stuck on using a particular brand of crackle medium.  I'm not so picky, but I say buy the size of medium that is suited to your job.  For instance, if you are like me and use it occasionally on crafting items, buy the small size that you can find in a craft store.  If you are doing furniture or walls, however its best and more economical to buy the larger sizes like you might find in a home improvement store.  
  2. Always use a darker base coat.  On this particular angel, the candlestick was already a dark brown so there was no need to repaint.  However, I also purchased a couple more candlesticks that were unfinished so they had to be painted first.  If you want your outer color to be dark, for instance a navy blue or bright red, you would want your base coat to be a lighter color.  The main idea is for the "crackles" to show through.
  3. Apply your crackle medium evenly throughout your project.  Don't glob it on!  And when you are crackling a surface such as this angel, with a whole bunch or rings and grooves, make sure you don't leave bubbles in the crevices.
  4. Let it completely dry.  This is the most important part.  I always let my medium dry overnight.  If you try to rush it, it will not be pretty.
  5. Paint the over-coat quickly and evenly.  If you go back to retouch, it just will not look very good.  I always try to work in small sections.  If you have some small area that doesn't have adequate coverage, you might have some success with pouncing or dabbing small amounts of the over-coat on.  You don't want to put the paint on too heavy either.  You will end up with drips and areas that will not crackle.  
  6. Spray a sealer once your surface is completely dry.  Overnight drying is nice, but usually not necessary if you are using acrylic paints.
Hope that helps to get you started on your own crackling journey.  If you want to turn candlesticks into angels, follow these directions for the base.  I completed with a wooden ball for her head and embellishments such as lace and pip berries.  The wings are made from a wood cut out that I found at a local craft store. I sprayed the entire piece with glitter blast and then a sealer.  I know you can probably think of some really cool ways to create your own angels.  I'd love to see them!

Monday, February 8, 2016

Monday, Monday......so good to me.....

I could sing those lyrics, but I really won't put anyone, even my pets, through that torture.  So, today is the Monday after the Superbowl and I am delirious because my beloved Broncos pulled off a win! You didn't know I am a fan?  Then you don't know me very well.  I have a complete Bronco wardrobe, including a beautiful watch.  Its Bronco time!
On Friday, my Sis and I did a bit of shopping in Denver.  I took her to my favorite thrift store and we had a blast.  They have a great assortment of Christmas decorations and craft supplies.  I got some great buys.  I bought some holiday stuffed animals and spruced them up a bit for resale.

                                      
I also bought this sleigh.  I had all the greenery and candle.  If you like sparkly, you will like this~!

 
This pumpkin was in my studio, nearly completed so I finished it up and it is now ready for Fall.

And believe it or not, I had six doll bodies stuffed, just waiting on faces, hair, and clothing!
I finally got around to painting one of the train cases.  It isn't quite finished yet.  I still have to take it outside to spray sealer on it and splatter it.  I also want to wrap the handle and put some greenery on it.  Maybe the wind will die down tomorrow so I can take it outside.

I bought two of these chicken wire pumpkins after Thanksgiving.  They were so fun to do.  They too, have to be sealed, but didn't they turn out cute?


So, see?  I have been busy.  Now for those dishes in the sink.......


Monday, February 1, 2016

Happy February!

So the start of February heralds about a foot of snow here.....and counting.  So it is a great time to stay busy and warm indoors.  In the studio, I have been busy finishing up a bunch of projects that did not get completed in time for last years shows, working on new materials that I purchased during the after Christmas sales, and trying to clean up a bursting studio.
I found some wooden blanks of angel ornies at one  of the craft stores for pennies.  They were easy to paint and I think they turned out so cute!
This tree was also an item I picked up at 90% off.  I simply painted and glued on some red buttons from my stash.

 I had purchased these snowflakes at the Dollar Store sometime before the holidays.  I had these little "faces" in my stash.  I simply painted the wood white, glued to the center of the snowflake and
Voila!  What do you think?  I still have to get them sprayed, so I may add a touch of glitter when I do.


 These are ceramic blanks that I picked up as well.  They have to be sprayed with sealer and need a ribbon added and I will be done......I put off the spraying until the weather clears......

In addition to painting, I also canned some pineapple that was on sale at the grocers for $.99 each.  I bought 10 and now can add it to my canned goods stash.....do you see a pattern here???
And since we are on the subject....stash = hoarding......I also visited a great thrift store.  This is really a danger for me......just kidding.  It is a blast to go there and check out the merchandise.  This weeks finds included a Liz Claiborne jacket ($2), a Dooney and Bourke handbag ($5)
a turntable for my hoard of brushes, pens, daubers, markers, etc, etc ($5)

 These two adorable little snowmen were only $2 each!
 I got a huge ceramic bowl, a Christmas platter, a child's porcelain tea set, some Halloween decorations, a snowman tray to make in to a centerpiece.  I did not pay more than $3 for any of it!
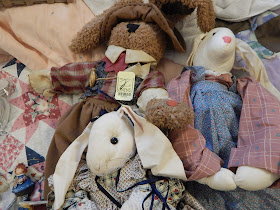
 And these little bunnies are in great shape for $2-3 each!
I feel like I scored!  I cannot wait to go back!  On Saturday, I attended a writing conference with my granddaughter.  It was great fun!  And who says you can't teach an old dog.......

So I am back at it, my friends.  Maybe I should do a bit of laundry or housework......Nah!