Here it is, hump day again, and the week is busy as usual. I am working on getting things ready for my show this weekend. Cider Days is a celebration of fall at Lakewood's Heritage Center. I will be there with sister Sue selling our wears and drinking some of the yummy hand pressed cider. Come out and visit! It is great family fun, with antique farm machinery, festival food and fun for young and old alike. Mention that you read about it on my blog and I will have a special gift just for you!
I will have witches and scarecrows and garland, oh, my! Things to brighten your home, decorate your table, and hang on your door. Hope to see you there!

Find my Patterns on PatternMart

Wednesday, September 28, 2011
Friday, September 23, 2011
Finally Friday
Well here it is Friday and who doesn't like to start the weekend with a brewski? Just remember to save the bottle caps! Save those caps (I prefer Bud Light Lime) and once you have collected a few, take the caps out and spray paint with your favorite color.
 I like to use a brown primer spray, but use your imagination! You can paint them black, neon green, pink, or Christmas red.
There are many sites that offer free or low cost graphics to use with your caps. I chose my design from EweNmePrintables.com. They are already in a one inch circle format. I turned the printed page upside down and used a one inch circle punch (you can view the photo from the bottom of the punch) but you can use a scissors. Even if they are not perfect, that's fine. Once they are cut out, glue them inside the cap.

 This needs to dry overnight. While drying, I like to make my tags. Using a regular manilla tag that you would find at a office supply store, tea stain the tag. I put a strong instant tea mixture in a plastic container and soak the tags until they are the stain that I desire. If you don't like the primitive look, you can omit this step. I like to lay my tags out in the sun to dry but you can put them in a 200 degree oven until dry as well. (Just be careful! You don't want a tag fire!)
When dry, I like to put a faint snowflake stamp on my tags. I use a tiny stamper and lightly brush a light buttermilk paint on the stamp. Apply to the dry tag. (You will want to randomly stamp and I even like to make them run off the edge of the tag)


There are many sites that offer free or low cost graphics to use with your caps. I chose my design from EweNmePrintables.com. They are already in a one inch circle format. I turned the printed page upside down and used a one inch circle punch (you can view the photo from the bottom of the punch) but you can use a scissors. Even if they are not perfect, that's fine. Once they are cut out, glue them inside the cap.

Coat the photo with ModPodge. Though it goes on white, it will dry clear. When dry, fill the cap with a resin, or I found this ModPodge dimensional filler. Again, it looks white but dries clear.

When dry, I like to put a faint snowflake stamp on my tags. I use a tiny stamper and lightly brush a light buttermilk paint on the stamp. Apply to the dry tag. (You will want to randomly stamp and I even like to make them run off the edge of the tag)


Finish off your tags by gluing the bottle cap at desired location, stamp or print message on tag, and use yarn, ribbon or twine to hang.

You can use these tags to decorate packages, hang on your tree, or use for gift giving.
But don't stop there! Think outside the bottle cap! You can also put a photo of your favorite person or pet in the cap and glue a pin back on it, (Grandma would love this!) or use a clasp and make a necklace. Make a fun ring or print letters in the cap and string together for a "HAPPY HOLIDAYS" garland. Dip the cap in glitter, either colored or white and make small ornaments for your tree.
The possibilities are endless! Drink up!
Sunday, September 18, 2011
Workin' the weekend
Saturday I had the house to myself and I got some much needed work done. Besides some baking and cleaning, I tea stained some doll bodies and hung them out to dry. Couldn't resist snapping this pic....so funny!
 I know that patterns have different sequences for making dolls, but here are a couple of tips that make it easier for me.
1. Make multiples. It is so much easier to make several dolls at once than to make one, then the next, etc.
2. If hand embroidering the faces, double up! I actually cut an extra piece out so that it is a thicker (doubled) fabric that I embroider through. Your thread won't show through muslin if it is doubled. I only use one thickness for the back though.
3. Stuff bodies, limbs, etc. and put each doll's pieces in a grocery back to keep them separate. If not, you could easily mix up arms and legs if using different patterns. The picture above is actually four different patterns.
4. Once the bodies are stuffed and sewn together, tea stain if desired. I like to hang them on a clothes line.
5. Do any painting after the staining has dried. My trick here (I paint shoes or stockings on most raggedies) is that I paint one leg, then hang it up to dry. Then I paint the next doll's leg, etc. I do this because I always seem to smear wet paint if I am working with two wet limbs.
I love to spend time giving each doll her own special look. I had some Halloween fabric so I decided to make a Raggedy Hatty.

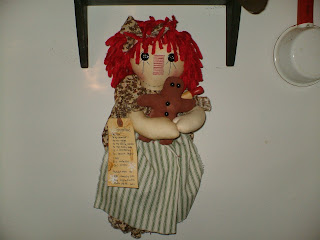
I also made one of the tissue holders with a fabric with tiny gingerbread men
on it. So in the dollie's arms, I placed a gingerbread man, a rolling pin, and hand printed a recipe for gingerbread. (Picture is shown without tissue)

I also worked on some really cool Christmas hang tags. They are perfect for gift giving, to hang as ornaments on your tree, or as package decoration. Stay tuned for a tutorial coming later this week!

Wednesday, September 14, 2011
Football season!
Couldn't resist posting a pic of my grandson, Quest in his High School football uniform. (How can I be old enough to have a grandson in high school?) I am very proud!


Busy, busy Fall
I think I have finally gotten my show schedule finished. I am going to be very busy! Maybe I should just take a nap right now. lol
Fall Schedule 2011Oct 1-2 Cider Days @ Lakewood Heritage Center, 801 Yarrow St
Oct 8 Overland High School, Aurora
Oct 13-15 Grandmother’s House Boutique Harvest Mkt, Blackstone Country Club, 7777 S. Country Club Pkwy, Aurora
Nov 3-5 Red Rocks Country Club Holiday Boutique, Morrison
Nov 4-6 Colorado Country Christmas, Denver Merchandise Mart
Nov 8-12 Grandmother’s House Boutique Holiday Market, Tagawa Gardens, 7711 S Parker Rd, Centennial
Dec 3-4 TommyKnocker Holiday Bazaar, Teller House, Central City
So, now I must get in gear and make some things! So, that is what I have been doing. I made up some pillows this weekend, another pumpkin and a couple of snowball fight snowmen. I am working on some raggedies now. And I have almost finished my new item: a snowman bag holder. He is really cute, a pattern from Samantha's accessories. I will post his photo as soon as I am done.
Have a great week everyone!
Wednesday, September 7, 2011
What cha workin' on Wednesday
Hope everyone had a great 3 day weekend. I was very busy as always. I finished a couple of projects and started a whole bunch more. These mice from The Pattern Bin (Samantha's Accessories) are sure to be a hit:
 The mice are made of painted muslin on a muslin tea stained candy cane, with sprigs of greenery and a singed tag that reads, "Not a Creature was Stirring." I also finished up a couple more of the mice on a matchbox bed. Kinda like the whole mice thing this year, I guess.
 I had some shiny bulbs that I bought at like 90% off last year and finally decided to do something with them:

This one lights up and I think it is really nice, even though shiny really isn't my style.
I also finished up some pumpkins. These are a great seller for me at my shows.

And I finished up another set of muslin snowmen ornies too!
 I also have 5 more Raggedies started, two of the large snowman heads, and a new item: a snowman bag holder. He is really a cutie!
Working on a show schedule and hope to get it finalized by next week. Busy, busy! My first show is October 1!
Later...........


This one lights up and I think it is really nice, even though shiny really isn't my style.
I also finished up some pumpkins. These are a great seller for me at my shows.

I listed a bunch of my Halloween commercial items on Ebay. And one of my little Raggedy tissue holders sold. Don't worry, I am making more!
 |

Working on a show schedule and hope to get it finalized by next week. Busy, busy! My first show is October 1!
Later...........
Subscribe to:
Posts (Atom)