Tuesday, July 31, 2012

Nativity

Today has been really busy.  I posted some new items on Ebay, which is really time consuming.  I ran errands and sent off some more application fees for shows.  So far, I have only double booked one.   This is my schedule so far:
August 26  St Mary's Harvest Fest:  One day, Sunday only, Bailey
Sept 21, 22  Unique Boutique Dry Creek and University, Centennial
October 6  Friends of the Library, Kittring Park, Littleton
Oct 27  Conifer Newcomers & Neighbors, Conifer High School
November 8-10 Red Rocks Country Club, Morrison
Nov 10 Ye Olde Yuletide Bazaar, Parker
Nov 13-17  Grandmother's House Boutique Tagawa Gardens

Last weekend, I was out with the grandies and did some garage saling.  I had fun but I'm not sure that they did.  I just wanted to share one of my great buys: 
This glazed ceramic set was a steal for only $8.  I got a few other Christmas things, mostly for resale.  It was so much fun just being with the kids.  Gotta go for now.  I'm hoping for a more productive day tomorrow.

Monday, July 30, 2012

Hey! Pumpkin Head!

I told you that I was going to tell you how to make these easy-breezy-lemon-squeezy little pumpkins.  So listen up.  You don't even have to get out your sewing machine.  I did all of these in about an hour and a half, that's one and a half episodes of Martha Stewart, y'all.
Okay, so here goes.  Cut out a circle of fabric.  No matter what size circle you cut, you are going to get a pumpkin about half the size.  I had this shiny orange fabric that I bought on clearance when WalMart was closing out their fabric department so I got it REALLY CHEAP!  So trace out a circle.  I used an embroidery hoop but you could use a plate, or a lid, or whatever.

Then you want to take a running stitch around the perimeter of the circle.  Turn it under as you go, so there will be a nice hemmed edge.  Hint:  I use hand embroidery thread, it's just a little stronger than regular cotton thread.  If you use a heavier fabric such as burlap, you might use a jute or even a dental floss. 
Pull your thread tight, gathering around.  Stuff firmly but not too tightly with fiberfill and anchor stitching by back stitching.  Its okay if a little hole is at the top.

Now you  need to cut three pieces of ribbon.  The length is going to vary, depending on the size of your pumpkin.  Here's what I did:  I measured double the diameter of the embroidery hoop that I used and it worked out just fine.  Fold the three pieces of ribbon in half and tie a knot there.  That knot will be the center of the bottom.  I used a pin to hold it in place until I was finished tying it on top. 
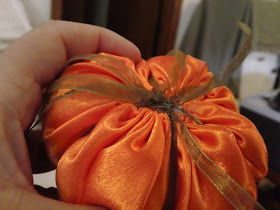
 Take the opposite ends of ribbon and pull tightly around the top of the pumpkin and tie in a knot.  Do this three times, dividing it into approximate sixths.  The bottom will look similar to the above picture. 
This is what the top will look like.  Then just finish it off.  I gathered up some small sticks from the yard and made stems, simply by breaking them into 2 inch pieces and gluing them on top.  Just push it down in that little hole that is up there.  Then add whatever garnishments you like.  I put a bit of moss around the stems and glued on a fall colored leaf.  I also used the blade of my scissors to curl the organza ribbon that I used.  (Some ribbon does not curl well so you can either leave it straight or cut it off)  Voila!  You have cute little pumpkin to add to your centerpiece, trim a wreath, or fill a cubby or bowl
 Hope you got all that!  Even little Angel was studying up on this!  lol

 Try this out and get a bit creative!  You can use gingham fabric, and maybe use jute instead of ribbon and trim with a rusty bell.  Make some smaller, some larger, and fill a washtub with them on the front porch.  Tie a tag on them for placeholders. 

More later, my bloggie friends.....

Friday, July 27, 2012

FINALLY FRIDAY

Well, here it is Friday.  I didn't get as much done yesterday as I had planned.  But I did get a scarecrow bobble head done.  What 'cha think?
Gotta bunch of errands to do today, so I'm keeping this post short.  Maybe I'll get to those pumpkins tomorrow!

Thursday, July 26, 2012

And the stockings were hung....

So, did I tell you I love Pinterest?  Well I saw these little stocking bowl fillers and though, "Hmmmm, I could do that!!"  But I made them into ornaments and changed them about a little:

Turned out cute, huh?  All I did was draw a stocking, sew two together, add a hanger and a furry top piece.  Takes less than 10 minutes.  And here is a real timesaver on whatever you are making:  Make multiples.  I cut these pieces out four at a time, sewed them all at once, and did hand work all at once while watching Dr. Phil.  You get done so much faster.
So today I am working on fall items.  I have a few fall shows, so I am working on my new item: scarecrow bobbleheads!  Still working out some details, but hope to have a pattern soon.  I also have some pumpkins that I am throwing together....and talk about easy....more later!

Wednesday, July 25, 2012

What 'cha Workin' on Wednesday?


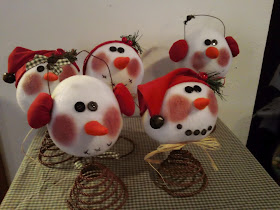
Well, you know I love my bobbleheads....so I have been working frantically on getting my inventory up.  And now, you can make them too.  I have finished putting my pattern together and will offer for $7 each, free shipping.   Check out the sidebar, and you can order now!  Comes complete with two looks, the hat as shown, and earmuffs, see below.  The rusty bed springs can be ordered on ebay, or you can make your own (instructions for rusting your own are included with the pattern!)  Right now, I am only offering the print version, but soon the e-version will be available.  So be sure to give your address when ordering.

I am finally getting to the bottom of my unfinished wood stash.  I finished up these sleds and scoop and finished some pillows that have been sitting around incomplete.


I'm working on another bobblehead pattern and hope to have it done by the end of the week.  Have a great day!

Sunday, July 22, 2012

Sunday afternoon Snowmen

So, remember how I promised that I would show you what to do with the ends that you cut off of those paintsticks?  Well, here it is:
First paint the paintsticks white, front, back and sides.  Next, drill holes in the tops as shown.

Paint the tops black, as shown, just a little past the indent.  Then I used the wrong end of the paintbrush to dot on eyes and a mouth.  These snowmen have a long face so put the mouth toward the bottom.  You can also draw on the eyes and mouth with a marker.

Now, I had these little resin noses that I bought a couple of after-Christmas sales ago.  I cut off the little stick like things and glued to the faces.
I cut 5 inch pieces of black wire to use for the hanger.  I threaded it through the holes, back to front, and made little circles with my needle nose pliers.  Then put a piece of ribbon above the edge of the "hat" so it kind of looks like a brim.  Trim the ribbon, add an embellishment, and tie on a little raffia and you have some really cute snowmen ornies!

If you don't have the noses, you can paint them on or make your own from fimo clay.  I used buttons and odds and ends to embellish the ribbon.


I also finished up some baby shoes.  I have been glittering some and bronzing others.  Here are a couple of pics of the finished product:

These can be finished off as pinkeeps, hold dried or silk floral, or hold battery operated tea lights.  I also finished off a couple of the glittered ones.  So far, I have sold every one that I have shown, so I wanted to get some completed. 
Hope you had a great weekend!

Saturday, July 21, 2012

Angels, Ornies,

I love Fridays!  Friday is my day to run errands, and lately it is my day to spend with my granddaughter, Skylar.  Skylar is 12 going on 30 and is so very talented in arts, music, and writing.  So, we love to play in the studio. 

I had been working on these new ornies that I saw on Pinterest.  Mine turned out different than the example but I like them just the same.
Okay, now here is the secret.....they are made out of paint sticks.  You know, the ones that you get at Home Depot for free!   So here is what I did:  I gathered my sticks (I have an entire box that I got years ago and didn't know what to do with them)  and I clamped about 5 or 6 together. 
I used a miter saw but you can use any kind that you want.

I cut them into 4 inch pieces.  You will get two out of each stick (this size is for the one gallon size) plus you will get a third piece that has the little indent at the top.  (Save that for a later project)

Once the sticks are cut, sand off any rough edges and drill two tiny holes in each.  I put several together and drilled through all of them.  After you drill your holes, paint them front, back and sides.  I used a dark brown paint but you can use any color that you want.  While they dry, print off the words that you want on your ornaments.  I found a template on TodaysFabulousFinds.com but you can also make your own.  In fact, the ones that I found were a little too big so I had to shrink them down.  I printed them out on white cardstock and then copied them onto a tannish paper.  You could use any kind of scrapbook paper that you want to as well. Skylar and I dry-brushed the edges to make them look aged.

Once the paint is dry and your words are printed, put a thin layer of ModPodge on the painted stick(front side only).  If your print on the stick shines through your paint, use that for your front side.  While the MP is still wet, put your paper words on top and use your fingers to press out any bubbles.  When dry, put another coat or two.  When dry, add your wire hanger, threading the wire back to front.  I used a needle nosed pliers to make little circles on the front side of the hanger.  Then embellish however you want.  Add bells, stars, raffia, glitter, etc.  I have a spiced glitter that I purchased from Sew Many Prims that is glitter that is lightly spiced and is a brownish color.  (smells divine, too!)  I put just a little MP around the edges and gave it just a bit of sparkle.

I also finished up a few of these angels too.  I was in Michael's last week and saw these sweet little wooden angels for a buck ea.  So I had to dress them up a bit and I think they are really sweet.

Simply, paint the body and wings the color of your choice.  I used a light buttermilk color.  Then cover the body with eyelet.  I used a narrow eyelet on the bottom so I could glue it just under the wings.  I used a wider eyelet on top.  I glued some moss on the heads, drew eyes with a marker, and glued on little stars.  For the halos, I painted some silver rings with a brown primer and glued on.  You can make a project like this your own, just use your imagination and get going! 

Wednesday, July 18, 2012

Just a note....

We have had quite a few stormy days here so what better time to spend in my studio....and I have been quite busy.  I finished up about a half dozen of the gingerbread men, another couple of crescent Santas, and another rag garland.  I have also started some ornaments that I hope to finish this afternoon.  I will place a tutorial on this blog when I am finished.

All the rain has been great for our garden.  We have had a bumper crop of lettuce this year.  I have had salads every day and have not bought anything!

Well, I've got some errands to run and want to get back so that I can get some chores done. 

Sunday, July 15, 2012

Candy corn and Gingerbread

I made some candy corn out of some scraps of muslin that I had laying around.  I try to use nearly every thread of fabric, cutting some into strips for rag garlands, some into small pieces for things like the candy corn, using some to trim pillows or other fabric craft.   I made some of these last year and they sold very well at my fall shows.  They are simply sewn together, painted, and a candy corn tag is printed off and pinned with a rusty safety pin.  I may age some of them later or even rub some cinnamon on them. 

This little ornament is a new item for me.  I saw this on pinterest and have made my own version.  Tell me what you think.  I think he is really cute!

Still making bobbleheads and santas, and hopefully will be starting on some new items this coming week.  Have a good Monday everyone!

Thursday, July 12, 2012

Still Bobblin'

I am really having fun making these bobble heads.  Here are three more that I finished.  I also cut some more out and finished up the beards(the hardest part) for three of the crescent Santas.  I was in town all day today looking for a class for my granddaughter and I to take.  I called my old teacher and she recommended a One Stroke class, so I am checking out one on Monday mornings.  Just waiting on a call back.


Tuesday, July 10, 2012

Christmas in July

We all have heard of Christmas in July, so now I know what all the fuss is about.  I have been working all week on items for my upcoming shows.  I am trying to get some of my best sellers done, and then I am on to new things.  I finished up another of the Cresent Santas (see last post), four of the Santa Clotheslines, four of the Wash Day Clothes Lines, four of the Santa's Long Johns, and two of the Christmas Rag Swags.


The swags have tiny red lights, but its hard to tell from the photo.   These swags sell really well and are so EASY to make.  Just take a strand of Christmas lights, I used a strand of 20 but you can use any size.  Tie on fabric strips.  That's it.  I use all my scraps and use a rotary cutter and cut strips about an inch wide and about 8 inches long.  But all the sizes don't have to be the same.  The difference in size and pattern makes it even more interesting.  This makes a great item to use as a fireplace swag, to hang on the wall over the bed, or swag over a window.  And you can make them in any color scheme.  Also if you don't want the swag to light, use rope or twine in the desired length.

Merry Christmas!