A couple of tips for making a doll like this, first of all, go for heavy yarn....like a nice thick rug yarn. It gives her this great 'touseled' look and is so thick, she doesn't even need a ribbon. And blush your dollies with blush, real makeup. A few people may use paint, but I think this is alot easier to control. I used a small flower pot and put in a couple of sunflowers. To make the flowers stand up in the pots, hot glue a styrofoam ball in the botton and then just glue in enough moss to cover the exposed balls. Another tip: shop at the dollar store. You can get moss, silk flowers, ribbon, and so much more there. The styrofoam balls were 6 in a bag for a dollar. They were over $4 at the craft store.
My other raggedy I am calling Candy. She is dressed in all red and white. Notice that I gave her bright red hair instead of the barn red on Suzanne. Since her costume colors are so bright, it just wouldn't look right to give her any other color.
I decided that Candy needed some Mary Janes so I just painted them on. For the ties, I simply used embroidery thread. She has on white eyelet loons and has a little red and white bear in her arms. The little bear may look familiar. He is not handmade. I bought a bunch of these several years ago for next to nothing and did not know what to use them for.....well, now you know.
I tea stain all of my dolls.....well, actually, coffee stain. Since we are HUGE coffee drinkers, I keep the end of the pot remnants in a spray bottle in the refrigerator. Just spray on as much as you like and dry. You can put the parts in a very low oven (I set it to 200 and then shut it off), hang on a line, or throw in the dryer. You kind of have to experiment to see which way you like best. You can also add vanilla and/or cinnamon to your stain. Your babies will smell so good!
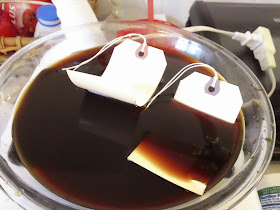
I use the same mixture to stain tags. And when I stain tags, I do a big batch of them. I use pie plates, filling them up with the mixture. See how the tags start to curl when they get wet??? Well, you cannot very easily stamp curly tags and besides, you want them to be stained all over, right?
I get a plastic lid (I think this is off of a whipped topping container), place it on top of the tags, and weight it down with something heavy. I used a whisk here, or you can use a spatula, spoon, etc.
Then lay them on a cookie sheet and place in an oven that is about 200 degrees. But, a word of caution, STAY IN THE KITCHEN! These things will burn easily, so if you are easily distracted like me, stay close.
Sometimes, you will want to turn the tags, especially if you got them really wet. It just keeps the moisture from pooling. If your tags get too wavy, and some will, you can press with a warm iron. I put a piece of brown kraft paper between the iron and the tag. If you use waxed paper, you might get some of the wax on the tag and your stamping may not turn out so well.
And since we are talking about coffee.....did I tell you that I am absolutely addicted to fat free french vanilla creamer???? Well, I am. But I am such a cheap skate, I hated throwing away all of those containers.....so, I found they make excellent canisters. You could use them in the kitchen, but I have found a dozen uses for them in my studio.
The label simply peels right off. This one, I use for filling sachets. I mix the lavender in with the pellets, and there is a handy, dandy pour spout. And the red cap goes so well with my studio! I also store bells, pompoms, buttons, etc. You can always see what is inside!
So, I thought this was going to be a short post but alas....again I am long winded. One last tip: When you are painting, make sure the cat doesn't jump up on the table.....need I say more????


No comments:
Post a Comment
Leave me a comment, a thought, or a giggle!