Wednesday, June 29, 2016

What 'cha Workin' on Wednesday????


I've been spending a bunch of time painting lately.  I am working on  working over a Santa chair that I bought at the thrift store.  It was all knicked up and kinda too cutesy for me.  So I am working on it and will post a pic when I am finished.  The one thing I did want to show you were these antique spindles that I purchased last summer at the 127 Yard Sale.  If you missed it, check out our great adventure!  I purchased a bunch of antique bobbins.

Last year I sold all of them after I had decorated for Chistmas.  I found a few more and Christmas'd them up a bit:


They look great in my old enamel bowl, don't they?

I'm also working on another suitcase!  Always fun!

This year I am going to show at a new venue, Simply Vintage Market.  The event takes place in October at the state fairgrounds in Pueblo.  And....you are all invited!  I will have more on this fun shopping adventure in future posts!  I will be selling vintage and antique Christmas and other decor, some repurposed from my junking finds.  Stay tuned!

Monday, June 27, 2016

Sunshine and Candy Canes

I love me some candy canes at Christmas, but I also like them in the summer.....I can explain. Summertime is the perfect time to make my sell-out favorite candy canes.  You start with these ugly plastic candy canes.
 I was going to edit out my shoe, but I thought you could better gauge the size of the cane (approx 32 inches)  You can find these in the Dollar Store and in Walmart.  However, the catch is that they are only available in the fall.  You can also buy them on line through Amazon, (see sidebar for link)

To cover these canes, I cut bias strips of white flannel, approximately 1" wide and as long as your fabric permits.  Starting at the crook end, wrap the cane, covering completely.  I secure the start with hot glue to hold in place and sporadically glue all the way to the bottom.  If your strip runs out, just add another and secure it with glue, slightly overlapping.  Secure at the end.

Cut one inch wide strips of the red fabric.  I used red fleece.  I like the fleece because it is stretchy and gives it dimension.  Wrap in the opposite direction that you wrapped the flannel, leaving a space between the "stripes".  Secure at both ends.

Now here is where the sunshine comes in.  I like to add glitter to my canes.  You can omit this step if you aren't a fan, but then I would ask.....What is wrong with you????  Just kidding. But glitter is a bit like Christmas icicles and Easter grass, once its in your house, it is everywhere!  Thus, outdoors in the sunshine....

I take the canes outside and using a sponge, coat each with ModPodge.  Do these one at a time. This can get messy!  Once the cane is painted with ModPodge, shake some sparkly white glue on it!  This is kinda fun.  I have a great tool I use for this:
 This is actually a parts sorter that I bought at Harbor Freight.  I sprinkle the glitter on the canes over this tray and then dump the glitter back into a large ice cream bucket so I never have to waste any glitter.  You have to work fast so that the glue will adhere to the modpodge  Let dry.  I hang them up on a makeshift clothesline so that they can dry evenly.

Once they are dry, they will have a hard, kind of sugary coating.  Take them in and embellish.  You can do it however you want.  I use jute to tie on some greenery and either a pine cone, rusty bell or pip berries.  Leave a loop in the back for hanging.  Then tie on a bow.  I always spot glue just to keep in place.  You can also add a tag.  Get creative!  If you want a more prim look, omit the glitter and tea stain.  Or wrap in homespun.  The sky is the limit!


Thursday, June 23, 2016

Easy, Peasy Thursday Tutorial

So I have this room off of the garage where we keep our freezer and my saw, sander, hand tools.  I also store my excess craft hoard.  It had kinda gotten out of hand so I went out and started sorting and cleaning.  To my amazement, (my attempt at sarcasm here), I found some things I had forgotten I had. Enter this box of glass ornaments.  Okay, I know the box is empty, but it was full.  Trust me....
I also had a bag of white feathers.....
So I simply put one little feather in each of the clear glass ornaments.

I cut 12 pieces of white organza ribbon, each 10" long.  You could use whatever ribbon you want.  I had this on hand.

Then I printed these little angel poems and used my tag punch to cut them out.
I threaded one piece of ribbon through the hole in the tag and then through the top of the ornament hanger.  I tied it into a bow.  The other piece got looped through the same place and knotted for hanging.

What a sweet little ornament!  I sell a ton of these at craft shows.  One tip is to keep them in the box that they came in.  These are breakable and it never fails that one gets broken.  These ornaments are the glass discs.  You could use round ones if you like.  You could use plastic ones or grosgrain ribbon.  You could make the tags round or use a fancy scissors to cut them out.

Here is the short poem that I used:
This is an Angel Feather
Sent from God Above
To Serve as a Reminder
Of His Most Precious Love

I simply put it in a word document.  I used this font: Freehand471 BT, in size 9 text.  You can play around with it to get the size and font that you like best.  Have fun with this!


Wednesday, June 22, 2016

What 'cha Workin' on Wednesday???

A busy week, but even though you can take the crafter outta the studio, you .....oh, you know what I mean.....I have a couple of minutes before running my next errand so I thought I would share the cutest, easiest fall craft ever.....

I told you that my friend had given me some craft items, right?  Well one of the items was a gallon bag full of cinnamon sticks.  What to do, what to do????  So I teamed up with my pal, Pinterest and saw the cutest little thing ever.  I'm gonna tell you how to make these sweet little pumpkins, but then if I figured it out, I bet you would too.


All you need for this project is: 
cinnamon sticks.  
      copper scouring pads
curly wire for trim
leaves
raffia
hot glue and glue gun

                                             
I bought the scourers at Dollar Tree, three in a package.  The cinnamon sticks I cut down to 2".  The curly wire is from my Etsy shop (you can purchase here) or simply make your own by curling a piece of wire around a pencil or paintbrush.  I used one of my wires per pumpkin, just bending in half.  I had some leaves in my hoard, so I just snipped off some.  The example on Pinterest used leaves cut from green felt.  Push the cinnamon stick down into the scourer, add the wire, leaf, and I used a little piece of raffia that I tied into a bow.  Hot glue in place.

Voila!!!  Now how cute is this?  Would be great as Thanksgiving favors, or for fall table place settings.  I'm gonna throw them in a basket in my kitchen......bonus.....they smell good too.

These are small and I am sure you can get larger scouring pads at the grocery store but you may have to pay a little more.  You could add a tag or another leaf.  Let me know how you make yours!

Monday, June 20, 2016

In the Good Ole Summertime....

We can always tell when summer rolls around, 'cause we always get a boatload of company trying to escape the heat......and we love it!  Last week was no exception either.  Hub's nephew and family were here for a couple of days.  We had not seen them in six years so it was amazing how the kids had grown (they have five: ages 8 - 16)  I also had my 4 year old granddaughter from Wyoming all week.....what a joy!  And my son and granddaughter stopped by.  If that wasn't enough, mix in a couple of doctor appointments and you have one busy week.  But now that they are all gone, it is sadly quiet here.

I did not get a lot of crafting done last week but I did make a great purchase from a friend of mine. She is moving out of state and is getting out of the craft show biz (she was a promoter and sold her show) so she sold me one of her displays for $25!  What a deal!


She also threw in some packaging and misc craft stuff (she knows I am a craft hoarder!)  She gave me about 50 of these cute little ornies.  I just repackaged them.  Aren't they cute?
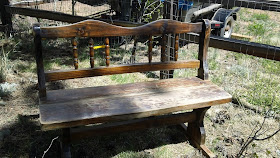
I love gardening!  But up here at 9500 feet in elevation, our summers are short.  So over the years, I have found what grows and what doesn't and put out a good sized garden.  I love to sit under the aspens and cool down out by the garden with a cold beverage (sometimes adult beverage) and relax.  Enter.....ta da....the garden bench.  If you have been reading this blog for long, you know that each year I paint up an old wooden bench that I used to have in my dining area.  This is what it looked like after sitting on the deck for a year.

 Then I painted it and it lasted for a couple of years.
Then I painted it again and added paw prints.

This year, I wanted something bright and colorful.  It seemed like a fun project to do with my four year old grand, Addyson.
 Don't mind the chairs in the background....they are for another project.  If you think it is silly taking on this project with a four year old, think again.  I didn't care if it was perfect.  I just loved spending time with her.  If I was doing this to show or sell, I would rethink it.  But every time I sit here now, I will think about our fun time.
 Am I going buggy?????  I let Addyson pick out what kind of bugs to paint on.   It was fun.  We just used craft paint and round sponges.  I drew the legs on with Sharpies.
 Of course, we sprayed sealer on it to get us through the summer.
Ok, my peeps.  I am off again.  It is sprinkling here, so I have a short reprieve on mowing the back acre.  Tomorrow Hubs has yet another medical procedure and on Wednesday I am playing taxi for my grandson.  Hopefully, I will be able to get back in the studio on Thursday.  I have a couple of great tutorials for you!  Have a great week!

Monday, June 6, 2016

Another Suitcase

I just love it when I find an old suitcase especially when it is in pristine shape.  This one was ugly on the outside but a real beauty on the inside.  I had a question about how I paint these, so to be brief, I just paint on acrylic paint and it always covers nicely.  After I paint on the design, I like to spray lightly with Glitter Blast.  (If you have never used this stuff, you've got to check it out.) You find it wherever you find spray paint.  (Michaels, Home Depot, etc)  You just spray it on like you would spray paint and it will make your project shimmer.  After its dry, spray one or two coats of sealer on it.  Here is what I do:  I have an old clothesline in the yard and I tie the suitcase on it.  That way I can spray all around and I never have to worry about it puddling on a table or newspaper.

What 'cha think?

I also finished up some little mini loaf pans that I picked up at a thrift store.  They would be so cute on a kitchen tree!


Well, my friends, I am off to finish up a couple of things.  I have to take hubs to the doctor tomorrow for a back procedure.  Pretty minor surgery, but he has to have a driver.  Have a great day!

Thursday, June 2, 2016

Thursday Tutorial....

Yeah, I know, it should be a Tuesday tute, but Tuesday was my daughter's birthday so I drove to Cheyenne to spend it with her.  Along with a long weekend, a two day trip to visit Heidi, my week is all jumbled up.  But I did want to show you how to make these really cute Rag Garlands.  This is one of those projects that are easy, peasy, lemon squeezy, but everyone will think you spent all so much time on it.
I sell a ton of these at craft shows and the main comment I get, "This looks like so much work!"  I just say that it keeps my hands out of the cheetos when I am watching television in the evenings.  Thats partially true.....I do these while watching tv.  lol  

These are the only ingredients:  a string of lights and some fabric strips.  Here are those easy peasy steps:
            1.  Open the lights
            2.  Tie on the fabric.

Voila!  That's all there is to it!  So, here are some pointers.

I choose fabrics that are in the same family.  Like the oranges and black for Halloween, reds, greens and whites for Christmas, pastels for Easter, and reds and pinks for Valentines day.  I like cottons because they aren't too stretchy but I also like throwing some shiny fabrics in for good measure.  I cut each strip with a rotary cutter about 1" wide and about 7" long.  On this garland, I tied on one checked fabric, one of the orange print, one check, one print, one black print, repeat.  I only make one tie, for example, you really don't need two knots.  I also put them on as tightly as I can so the garland turns out nice and full.  There really is no wrong way!  Have fun with it.

I use a strand of 20 lights.  I find that this is the perfect size (about 5 feet in length) to sell and display at shows.  The longer ones take too long, and are too hard to show.  But if you are doing this for yourself, use the size you want....just cut more strips.

Tip:  When I display these at shows, I hang them up near the entrance to my booth.  They draw so much attention and I always sell out.

Another tip, when doing shows:  If you can afford it, pay the extra for electricity if your promoter offers it.  It usually is only $15-25 and brings so many people into your booth.  In a sea of craft booths, one that is lighted draws the attention of folks who might walk on by.  Someone told me once, if you want to sell it, light it.  This is really true most of the time.

Another hint, since you know I hate to waste things, I cut up my scraps into strips if the fabric I am using for another project fits my criteria.  I put all my reds together, greens, pastels, etc in gallon zip bags.  When the bags get full, its time to make a garland.

I buy my lights at the dollar stores in season or at craft stores, or you can get them at Amazon. (See link below)  Have fun with this!


So if you are a long time reader, or even if you are just stopping by, you may notice that I have some new ads on the sidebar and at the bottom of the blog.  I have been blogging for six years, without advertising or monetizing this blog.  I try to offer tips and tutes for free and love sharing any ideas with you.  But it does take a lot of time, thus money.  I have included only vendors that I am familiar with, have purchased from, or may be of help to you.  I am not going to bombard you with pop up ads, however, if you are going to purchase from any of these vendors, why not click through here?  I get a small commission and you get the normal great purchases.  If you don't need or want to click on the ads, that's great too.  I will keep giving you the same info as always, but I will let you know if these vendors have any sales as well.

Phew!  Glad to get that out of the way.....now on to making more STUFF!