Find my Patterns on PatternMart

PatternMart.com
Showing posts with label angels. Show all posts

Wednesday, July 5, 2017

Angels Amongst Us

I don't know about you, but I believe in angels.  And I love making angels as well.  These angels came about quite accidentally.  I bought these lawn ornaments at the thrift store and was actually going to put them in my flower bed.  But the more I stared at them, the more they looked like angels.
 The hardest part in creating these angels was attaching the heads.  I thought that the ornaments were made of wood.  Nope, resin.  In order to get the wooden heads to adhere, I needed a flat surface.  So I had to saw across the top of the resin which my band saw wasn't too happy about.  I painted the surface with Waverly Ivory chalk paint.  I love using this paint because it is so forgiving.  And it dries very quickly.  Then I aged it with an antique wax from Folk Art.

This first one has a pair of rusty tin wings that I salvaged from a broken ornament.  I used silver tinsel on all.  Heads were painted fleshtone, blushed and eyes were dotted with a sharpie.  I added an organdy bow at the neckline.
I bought these wings at Michaels.  I found them in the floral department.  Since the bodies are resin, the wings were hot glued on.
Another set of wings from Michaels.

I think this is my favorite.  I love the filagree wings, also from Michaels, and the shape of the ornament makes it look like a skirt.

We had a nice holiday, although we are really needing rain here.  I give my plants loads of water and they love it!


Monday, May 16, 2016

Rainy Day...and Monday....

What a dreary day this has been!  Rainy and cold.....a perfect day to finish up some things in the studio.  Several weeks ago, I bought some panels at the thrift store.  You never know how these things are going to turn out.  And it took a while to get these made up.  Sewing, stuffing, and embellishing....


I added hats and scarves and glued on buttons and stars, even added the little circle tags.  The arms are made from brown paper covered wire, though the pattern called for twigs.  Twigs break so easily and when you are storing for shows, that becomes an issue.  Besides the wire can be twisted however you like it.

I also found some new tassels that I turned into angel ornies.


 And I made some more ping pong snowmen.  I sold around 100 of these last year so I am trying to build up my stock!
If you want a tutorial on how I make these, click here.

I had better get busy now.  I have so many ideas, and so little time!  Can't wait to show you what is next!

Friday, June 14, 2013

Angelic Friday

Just a quick post and I am off to the doctor.  I finished up some more of my flower angels and  they look so cute:
Have fun with these.  Personalize each one, making it a bit different, special:

Make their hairstyles different.   I used ribbon for some of the wings, but you could also use hearts, stars, grapevine, etc.  Some of my angels have ribbons or pearls at the neckline, some don't.  Thi will make a great item for gifts or for your craft shows. 

Have a great weekend......and happy crafting!

Saturday, July 21, 2012

Angels, Ornies,

I love Fridays!  Friday is my day to run errands, and lately it is my day to spend with my granddaughter, Skylar.  Skylar is 12 going on 30 and is so very talented in arts, music, and writing.  So, we love to play in the studio. 

I had been working on these new ornies that I saw on Pinterest.  Mine turned out different than the example but I like them just the same.
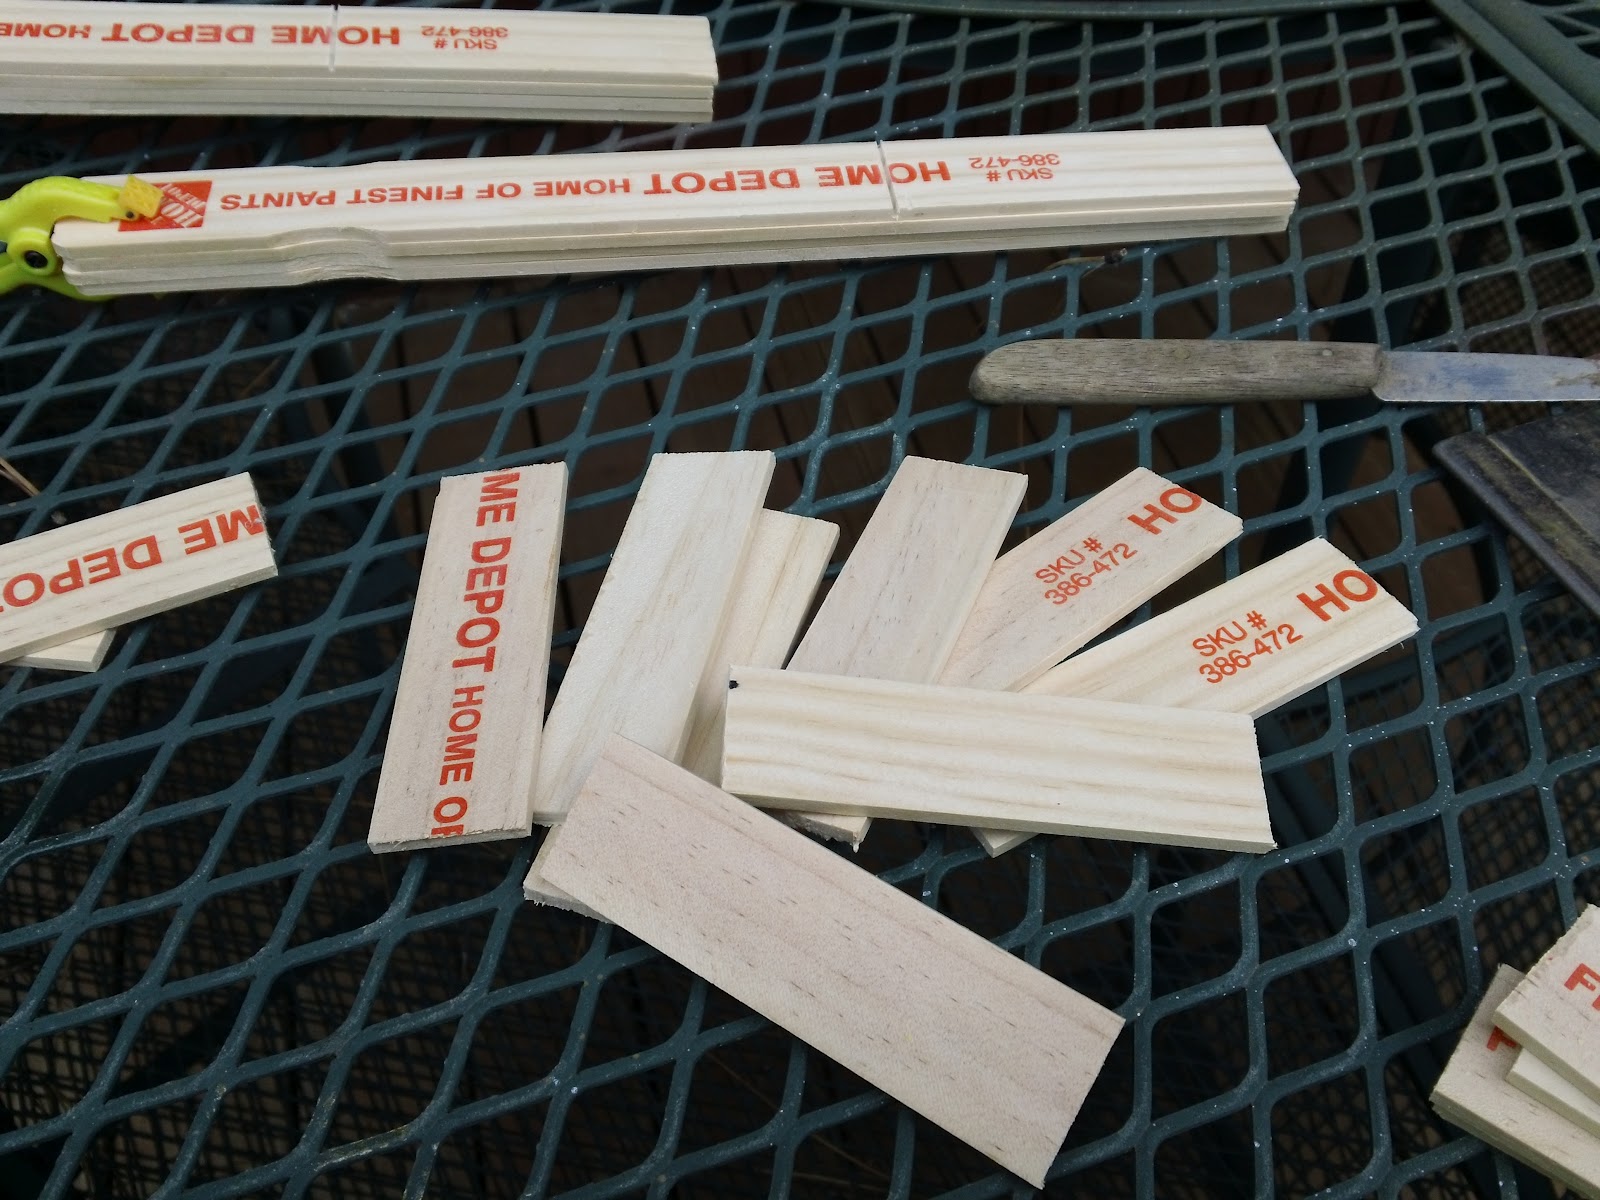
Okay, now here is the secret.....they are made out of paint sticks.  You know, the ones that you get at Home Depot for free!   So here is what I did:  I gathered my sticks (I have an entire box that I got years ago and didn't know what to do with them)  and I clamped about 5 or 6 together. 
I used a miter saw but you can use any kind that you want.

I cut them into 4 inch pieces.  You will get two out of each stick (this size is for the one gallon size) plus you will get a third piece that has the little indent at the top.  (Save that for a later project)

Once the sticks are cut, sand off any rough edges and drill two tiny holes in each.  I put several together and drilled through all of them.  After you drill your holes, paint them front, back and sides.  I used a dark brown paint but you can use any color that you want.  While they dry, print off the words that you want on your ornaments.  I found a template on TodaysFabulousFinds.com but you can also make your own.  In fact, the ones that I found were a little too big so I had to shrink them down.  I printed them out on white cardstock and then copied them onto a tannish paper.  You could use any kind of scrapbook paper that you want to as well. Skylar and I dry-brushed the edges to make them look aged.

Once the paint is dry and your words are printed, put a thin layer of ModPodge on the painted stick(front side only).  If your print on the stick shines through your paint, use that for your front side.  While the MP is still wet, put your paper words on top and use your fingers to press out any bubbles.  When dry, put another coat or two.  When dry, add your wire hanger, threading the wire back to front.  I used a needle nosed pliers to make little circles on the front side of the hanger.  Then embellish however you want.  Add bells, stars, raffia, glitter, etc.  I have a spiced glitter that I purchased from Sew Many Prims that is glitter that is lightly spiced and is a brownish color.  (smells divine, too!)  I put just a little MP around the edges and gave it just a bit of sparkle.

I also finished up a few of these angels too.  I was in Michael's last week and saw these sweet little wooden angels for a buck ea.  So I had to dress them up a bit and I think they are really sweet.

Simply, paint the body and wings the color of your choice.  I used a light buttermilk color.  Then cover the body with eyelet.  I used a narrow eyelet on the bottom so I could glue it just under the wings.  I used a wider eyelet on top.  I glued some moss on the heads, drew eyes with a marker, and glued on little stars.  For the halos, I painted some silver rings with a brown primer and glued on.  You can make a project like this your own, just use your imagination and get going! 

Sunday, January 8, 2012

Do you believe in Angels????

I don't know if you believe in angels, but I do.  And I wanted to show you the angels that I made today from things I had on hand in the studio.  One of my resolutions is to destash, declutter, and reuse more.  I did alot of decluttering in 2011, but I have so much more to do.  Anyway, as I was packing  up my Christmas decor, I ran across some of these angels in a trunk.  I had made them years ago and they needed some repair.  I started digging around in the studio and found additional angel heads, plastic cones, and wings. 

This one is my favorite, approximately 16 inches tall, porcelain head, made from two vintage doilies.


For those  who like a bit more sparkle, this guilded angel is for you.  She is about 11" tall .
This angel is fleece and feather covered with a pearl trim neckline and halo.  Very whimsical.
If interested, all of the angels in the top photo will be listed for sale in my Etsy shop:  They are each different, one of a kind and will range in price from $6.95 - $19.99.

I also wanted to mention another giveaway.  This one is from Brenda at the Rusty Thimble.  Check out her primitives at http://therustythimble.blogspot.com/

And lastly, but certainly not least...I wanted to publicly thank Sandy at the Olde Country Cupboard.  I won her giveaway for some candles.  I can't wait to receive them...and I surely will post pictures.


Have a great week and come back soon.