Find my Patterns on PatternMart

PatternMart.com
Showing posts with label ornies. Show all posts

Wednesday, July 13, 2016

What 'cha working on Wednesday?

Seems like the week has just flown by.  I have been having quite a few medical tests lately and Monday was one of those days.  I got absolutely nothing done at home, but my sis went with me and we did some shopping.....what else?  I have done a few things though, some oldies but goodies....

Another wreath....
Sorry for the drawing behind it.....I am such a bad photographer!

I also did these cute little piggie chalkboards.
These were kits that I found in the clearance section at Walmart for.....get ready for it.....$1.50!  I simply stained the base and added the ribbon/raffia/bell.

The other thing that I finished up were Santa Paintbrush Ornies.  I have been doing these for about ten years, and they sell like crazy.
These little guys are easy to make but they do take a little time.  First get all your supplies together.

I use a two inch chip brush.  These are really inexpensive.  I buy mine at Harbor Freight where I get a huge box for around $15-$16.  In addition, you will need acrylic paints:  flesh tone, light buttermilk, barn red.  Gold paint, powder blush, small wooden noses, woodsies for the mustache, wooden discs for the faces, sharpie, greenery trim, blush, brushes, glue gun, hot glue, and pliers/wire cutters.  Also some rusty wire and bells and some white or off white fleece.

Since I make a bunch of these at a time, I start by painting the wooden part of the paintbrush with barn red.  You can use any red that you like.  I prefer a bit more prim.  You will want to paint one side and let it dry.  Then paint the back.  While the one side is drying, paint the wooden discs, and tiny noses with flesh tone paint.  You don't need to paint the back but you should paint the sides.  Paint the woodsies with light buttermilk.  You can also use any shade of white or off white that you like.  These woodsies come in a package of mixed shapes and sizes.  I use teardrops, stars, triangles, hearts, etc.
Paint the metal part of the paintbrush light buttermilk and pull the paint down into the bristles.  Let it dry.  Flip the brushes over and paint the back with the barn red and light buttermilk like you did on the front.  Don't forget to put some paint in the hole at the top of the brush.  Dot the front side with gold paint by dipping the end of your paintbrush into the paint and dabbing on.

Let this completely dry.  Now comes the fun part!  Assembly.  With your hot glue gun, glue the disc to the center of the metal part of the brush.  Glue on the nose and the "mustache".  With a sharpie, make two dots for eyes.  Using a paintbrush, apply dry powder blush on each "cheek".  I apply it heavily and then blow of the excess.  Cut a piece of fleece (I used a textured fleece that kinda looks like fur) about an inch wide and long enough to wrap around the top of the face and glue in the back. Add your embellishment.  I used a small piece of greenery and a couple of berries.

Cut a piece of wire and stick it through the hole at the top of the brush.  Thread on the bell.  Twist the wire into a circle for hanging.  This is where you will need your wire cutters/pliers.  And you are done!  I display them in an old enamel bowl.
You can have fun with this project.  Change up the paint colors.  Instead of dots, do stripes.  Instead of the wooden mustaches, attach doll hair or yarn.  Instead of the wire (it is hard on the hands) use ribbon.  Make it your own!  I would love to see your pics!


Thursday, June 23, 2016

Easy, Peasy Thursday Tutorial

So I have this room off of the garage where we keep our freezer and my saw, sander, hand tools.  I also store my excess craft hoard.  It had kinda gotten out of hand so I went out and started sorting and cleaning.  To my amazement, (my attempt at sarcasm here), I found some things I had forgotten I had. Enter this box of glass ornaments.  Okay, I know the box is empty, but it was full.  Trust me....
I also had a bag of white feathers.....
So I simply put one little feather in each of the clear glass ornaments.

I cut 12 pieces of white organza ribbon, each 10" long.  You could use whatever ribbon you want.  I had this on hand.

Then I printed these little angel poems and used my tag punch to cut them out.
I threaded one piece of ribbon through the hole in the tag and then through the top of the ornament hanger.  I tied it into a bow.  The other piece got looped through the same place and knotted for hanging.

What a sweet little ornament!  I sell a ton of these at craft shows.  One tip is to keep them in the box that they came in.  These are breakable and it never fails that one gets broken.  These ornaments are the glass discs.  You could use round ones if you like.  You could use plastic ones or grosgrain ribbon.  You could make the tags round or use a fancy scissors to cut them out.

Here is the short poem that I used:
This is an Angel Feather
Sent from God Above
To Serve as a Reminder
Of His Most Precious Love

I simply put it in a word document.  I used this font: Freehand471 BT, in size 9 text.  You can play around with it to get the size and font that you like best.  Have fun with this!


Monday, June 20, 2016

In the Good Ole Summertime....

We can always tell when summer rolls around, 'cause we always get a boatload of company trying to escape the heat......and we love it!  Last week was no exception either.  Hub's nephew and family were here for a couple of days.  We had not seen them in six years so it was amazing how the kids had grown (they have five: ages 8 - 16)  I also had my 4 year old granddaughter from Wyoming all week.....what a joy!  And my son and granddaughter stopped by.  If that wasn't enough, mix in a couple of doctor appointments and you have one busy week.  But now that they are all gone, it is sadly quiet here.

I did not get a lot of crafting done last week but I did make a great purchase from a friend of mine. She is moving out of state and is getting out of the craft show biz (she was a promoter and sold her show) so she sold me one of her displays for $25!  What a deal!


She also threw in some packaging and misc craft stuff (she knows I am a craft hoarder!)  She gave me about 50 of these cute little ornies.  I just repackaged them.  Aren't they cute?
I love gardening!  But up here at 9500 feet in elevation, our summers are short.  So over the years, I have found what grows and what doesn't and put out a good sized garden.  I love to sit under the aspens and cool down out by the garden with a cold beverage (sometimes adult beverage) and relax.  Enter.....ta da....the garden bench.  If you have been reading this blog for long, you know that each year I paint up an old wooden bench that I used to have in my dining area.  This is what it looked like after sitting on the deck for a year.

 Then I painted it and it lasted for a couple of years.
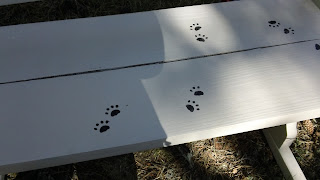
Then I painted it again and added paw prints.

This year, I wanted something bright and colorful.  It seemed like a fun project to do with my four year old grand, Addyson.
 Don't mind the chairs in the background....they are for another project.  If you think it is silly taking on this project with a four year old, think again.  I didn't care if it was perfect.  I just loved spending time with her.  If I was doing this to show or sell, I would rethink it.  But every time I sit here now, I will think about our fun time.
 Am I going buggy?????  I let Addyson pick out what kind of bugs to paint on.   It was fun.  We just used craft paint and round sponges.  I drew the legs on with Sharpies.
 Of course, we sprayed sealer on it to get us through the summer.
Ok, my peeps.  I am off again.  It is sprinkling here, so I have a short reprieve on mowing the back acre.  Tomorrow Hubs has yet another medical procedure and on Wednesday I am playing taxi for my grandson.  Hopefully, I will be able to get back in the studio on Thursday.  I have a couple of great tutorials for you!  Have a great week!

Monday, April 25, 2016

Snowmen and Ornies and Strainers, oh, my!

Hello, my peeps.  I have been a busy little crafter this last week.  After finishing my suitcases, I dug through some of my thrift store finds......
 Got this bag of little round metal boxes for $2.95.  I don't know what these little boxes were for initially, but when I see round, I think snowmen.  I had a bunch of round magnets so I glued them on to the back.
 Then I just painted on some cute little snowmen faces......  I love doing snowmen.  They are so easy and they don't have to be perfect!  I usually sell out of magnets every year.  These should be really popular.  Oh, yeah.  If you are displaying magnets at a craft show, cookie sheets or old metal bowls make great displays!
So this thrift store that I go to, packages like items in plastic bags and sells them really cheap.  The good thing is that it is really, really cheap.  The bad thing is you can't see what all you have or if anything is broken.  I never pay more than four or five dollars for a 'bag o stuff'' and it is always worth it just to see what goodies I get.  One of the bags I bought had these giant bells in it.
 I simply added a hanger and some ribbon and made ornaments out of them.  So easy and so cute!

This little box was an item I picked up at one of the craft stores after the holidays.  I painted it red and then crackled it with a light buttermilk paint.  For the cut-out, I quilted some green plaid fabric.  I glued on rusty bells and a star.
I bought this strainer last year while on the 127 sale.  I had to drill a hole in the handle for hanging.  I simply glued in some moss and greenery, added a snowman and a homespun bow and it becomes the perfect holiday decoration.  Wouldn't this look adorable in the kitchen??
 This is another box that I bought a while back from the thrift store.  I think this centerpiece looks so cool!
Time for me to get a few things finished up.  I am working on a new pattern and hope to have it ready this week.  As soon as I get it done, you will be the first to know!  I can't wait to show you!

Hope your week is great!

Tuesday, August 26, 2014

Happy Tuesday!

Mornin' my peeps!  Busy weekend as always.  On Friday, I went to Brighton and purchased some veggies, 'cause, you know, its that canning time of year.  Up here, tomatoes, peppers and squash don't grow very well because of our short season.  And I do love some homemade canned goods.....
I canned jalapenos, hot salsa, and corn relish.  My new item this year is candied jalapenos.  We will see how they go over.  The corn relish is my mom's recipe and I love it.  It has a sweet and sour brine with corn, peppers, onions and celery.  Type the word corn in the search bar at the top for the recipe.

I got a request for a bobble-head pattern.  It is now listed in my Etsy shop.  I will be working on another pattern for a bobble-head scarecrow later this week.

I have listed the rusty bed springs for sale on my Etsy shop as well.

I also finished a couple of bears.  I like to make them out of unexpected fabrics and colors:

 These are also for sale for only $10 each.  They come complete with a little tag that says I love you, an organza bow, and eyeglasses.

I finally got around to working with one of the cutter quilts that my friend gave me.  I made the following four ornies.  I love the Victorian feel to them.


I will make more of the stocking and mitten.  I have to revisit the star and the heart.  Since it is a double thickness of quilted fabric, it was impossible to turn.  I think I will simply back it with muslin so the edges can be turned.
I have two raggedies cut out but still incomplete as well as some ornies that need to be finished.  I try to get all the painting and machine work completed during the day so that during the evenings I can do the hand stitching.

Today is my son, Scott's birthday.  I am treating him to lunch.  Actually, it is a treat for me as well.  Love you Scott!

Tuesday, June 4, 2013

New ornie and wooden spoons

Hello, my peeps.  I know, I should be posting more, but it just hasn't been in the cards...hehe....Here is another dollar store craft for your Christmas gift giving.  Wooden spoons!  I cheated a bit and bought these at Wally World (4 for $.88)  It is so simple!  Simply paint them white, front and back and add faces and a bit of homespun as a tie.  These are really cute given with kitchen towels or hot pads.  You could also put together some recipes and tie this on.
I also was cutting out some "Santa's Clotheslines" from red felt and I had some rather large scraps left over.  I decided to make Santa's hats as ornies.  I simply measured around the outside of a battery operated tea light (dollar store buy, 3/$1) and drew out the shape of a hat.  I had to experiment with the trim a little, but another good way to use up scraps.  I poked holes in the top and cut a piece of rusty wire (about 8" long)  I curled the ends of the wire and hung on a little tag that says, "He's making a list and checking it twice."  Then I glued a rusty bell on the bottom.  I think these will be a great seller at craft shows!  Total cost to make is less than fifty cents!

Well, my bloggie friends, off to water the garden.  Maybe it will rain......

Thursday, March 1, 2012

March 1....a new beginning

Well the big 6-0 has come and gone, we got past leap day without a major world crisis, and March has come in like a lion, at least here....It seems like we have had snow almost every day for the last couple of weeks.  Maybe I'm just noticing it more since it was all rainy and green when I was in Texas.  I have been working on some projects this week.  I made more of the pink raggedies:
If you would like a Pretty in Pink Raggedy, let me know.  I am selling them for $19.99 each.  There are different pink fabrics for their dresses and pantaloons and all the faces are different.  Bodies are coffee stained. 

I also finished up some small pumpkins.  This was another project that was a work in progress.  These are great bowl fillers,  and were a great seller for me last year.  They are made of muslin, painted orange.  I use Americana Canyon orange, but you can use your favorite color.  Use up fabric scraps to make these.
When I was in Texas, I found these miniature kitchen utensils at a five and dime.  I just embellished and they are ready for sale.  I did about a half dozen each of the graters and whisks, but only did a couple of the ladles


I think they really turned out cute and now I am on the lookout for more mini-utensils. 

Well, my bloggie friends, hope your day goes well. My kids and grandkids will be here to celebrate my birthday on Saturday.  I can't wait!  And lastly,  my heart goes out to all those in the hard hit areas of the midwest who have lost much in the recent tornados.